Maped Controls
Contents
Maped keys quick reference
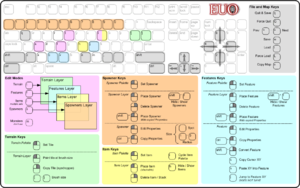
A quick reference chart of the keys and mouse operations listed below is also available. Due to the rarity that some of the operations, a few of the keys are omitted.
Maped keys summary
The ? key shows this help screen inside Maped!
moving around the map
up
down
left
right	scroll large maps. Use the keypad to scroll more quickly.
selecting what to edit
f	edit features
i	edit items - keep pressing to see more items
t	edit terrain - keep pressing to see more terrain
s or m	edit spawners
loading and saving
l	load level. Type number when prompted. You will be prompted to save.
shft-l	load level as above, but with no save
ctrl-r	reload a level
w	saves (writes) map
q	save and quit
shft-q	quit without saving
shft-s	set map folder (default is smaps) : good for keeping maps sorted in subfolders
changing levels
<	load previous level WITHOUT SAVING
>	load next level WITHOUT SAVING
shft-x	load this map's parent level (to simulate exiting towns for example)
space	when the orange square at the centre of the screen is hovering on a level changer or teleporter pressing space will enter that level (w/o saving the old level)
j	will attempt to change into the level or follow a teleporter where the mouse is hovering
shft-j	when hovering over a destination, attempt to jump from the destination to the teleporter
k	jump back to where you last jumped from with the j key
painting maps
[	decrease brushsize
]	increase brushsize
alt-g	replace all of the tile that is hovered over with mouse with the currently selected tile from palette
shft-h as above but contiguous replacement only
useful keys
r	resize map. Press r then type the new size (eg 20 30) when prompted.
p	edit map properties (eg name, wither its dark , the map type).
ctrl-l	reloads maped.cfg - needed when chging paintsets or random level params
renumbering a level
n	renumber / copy level
shft-n	change all target values to a new value for level changing triggers (don't use)
randomisation
shft-t	toggle map randomisation algorithm (either caves or dungeons)
shft-r	generate random cave (only works on blank levels)
other
shft-D	does a ascii-code map dump - you probably won't need this
ctrl-d	dump a small png file of the map
shift-ctrt-d dump a huge png of of the map
display
shft-f	hide/show features
h	hide/show items
shft-h hide/show spawners
z	toggle zoom
shft-v	toggle player-visibility-mode ... allows you to see what the map looks like in-game
paintsets 0-9 select a paintset
regions - see Maped Regions or http://forums.swut.net/viewtopic.php?p=65285#p65285
alt-n	set your active region number
alt-r	show/hide regions - they are on by default
e	sets the region top left corner
shft-e	sets the bottom right corner, and if 'e' was used correctly, a region will be instantly created
alt-e	delete all regions by number
When hovering mouse over a feature in feature edit mode:
c	copy the cursor's map-xy for feature target-xy placement
v	paste the copied xy into a features target
When hovering mouse over a spawner in spanwer edit mode:
`	set spawner radius to -1 (spot spawner)
1-0	set spawner radius
- +	decrease/increase the spawner's max monsters to spawn
Maped mouse operations
left click
- editing features : add new blank feature. Click it again to edit its properties.
- editing monsters : add monster after selecting one from the palette
- editing map : change a map tile
- editing items : place an item. Items may be piled on top of each other.
right click
- edit features / items / monsters : delete that feat/item/monster
- edit map : set the current paint tile to that which you just right clicked (a bit like an eyedropper)
With player-visibility turned on (shift-v) clicking/holding right mouse button allows you to similuate walking around.
middle click
- centre on mouse cursor
- middle click and drag to pan
Extended mouse/keboard ops
Changing floor tiles beneath transparent tiles
After placing a tile with transparency (e.g. path, chair, table, etc.) its background can be set manual to any desired floor tile. For this select the floor tile and place it by using ctrl-left-click on the exiting tile with transparency. The floor tile should appear under the furniture and a small pink 'u' indicates the placed under-tile.
Copying spawners & features
When editing spanwers:
- Use ctrl-Lclick on a spawner to copy it's values to memory.
- Use shift-Lclick to place a memory copy of that spanwer.
The same goes for copying features, except that you must be in edit-feature mode to do so. The mouse operations are the same.
Changing a feature type without changing its values
In feature edit mode, select a feature from the palette, then shift-right click on an existing feature on the map to convert it to the selected feature.
Eg, say you wanted to change a LXY to a TEL, but wanted to keep the feature's dest-x and dest-y, select TEL from the palette, then shift-right-click on the LXY on the map to convert it to a TEL.
| Main Page | Customization and Scripting | |||||||||||||||||||||||||||||
| ||||||||||||||||||||||||||||||
