Difference between revisions of "Quickstart Guide Regular"
(→Dying) |
m (small adjustments on race section) |
||
| (150 intermediate revisions by 18 users not shown) | |||
| Line 1: | Line 1: | ||
==Quickstart Guide== | ==Quickstart Guide== | ||
| − | + | To get started, [http://euotopia.com/download.htm download the installer], install, [http://euotopia.com/newaccount.html create an account] and run euo.exe. | |
| − | + | This game is rather fast paced and even a little twitchy. Unlike other MMORPG's, you generally fight more than one monster at a time, and battles are usually pretty quick. It helps to know where your spells and items are and what they do. It also helps to have a guide early on in the game. There are many players who will happily take a newbie through their first romp of the Nordhaven Jail. | |
| − | + | ||
| − | + | ==Tutorial Video== | |
| + | <html> | ||
| + | <iframe width="480" height="360" src="https://www.youtube.com/embed/hfg0CQfrHbI?rel=0" frameborder="0" allowfullscreen></iframe> | ||
| + | </html> | ||
| − | ==Character | + | ==Character Creation== |
| + | [[image:Cr0.png]] | ||
| − | + | At this screen press any key. It should bring up the main menu. If it doesn't, alt-tab out and back in again, then press a key. | |
| − | |||
| − | + | [[image:C01.png]] | |
| − | + | Press the arrow key down once so that ''Create New Character'' is highlighted, then hit Enter. | |
| − | |||
| − | + | [[image:creation.png]] | |
| − | + | ||
| − | + | ||
| − | + | Enter your account name and password in the appropriate fields. Use the up and down arrow keys to navigate the fields. If you don't have an account then you will have to make one - [http://euotopia.com/newaccount.html click here]. Pick a name, your gender (gender does not affects stats or gameplay), an avatar, your [[Races|race]] and a class. Use the left and right arrows to select your gender, avatar and class. Once done, press the down-arrow key to highlight '''enter the world of EUO!''' and press enter. | |
| − | + | If you are a brand new player simply choose the Regular server. | |
| − | + | It's not critical which class you pick as it only affects starting skills. Your class evolves through your playstyle - though of course you can decide on a class to build and stick with that from the start. The classes you can choose from when creating are: | |
| + | * swordsman, macefighter, spearman, axeman: these are fighter prefab packages, specialising in melee weapons and close quarter combat | ||
| + | * assassin, swashbuckler, ranger: these are rogue prefabs. Assassin is dual wielding and comes with points in stealth. Ranger starts with a bow and swashbuckler starts with a foil. | ||
| + | * monk: starts with points in unarmed and the sanctity school of magic | ||
| + | * mage: starts with points in sorcery and magery | ||
| + | * priest: starts with points in blessed maces, piety and divinity. | ||
| + | * necromancer: starts with points in necromancy, hexblades and bonecrafting | ||
| − | + | Remember: it's not critical what class you choose because the class you become is defined by what skills you use. See the section on [[classes]] for more. | |
| − | * | + | Here's a quick overview of the available [[races]]: |
| − | * | + | * Human - Get a little more xp and can multiclass further than other races (on reg/pd) by meditating at the [[Shrines#Shrine of Versatility|shrine of versatility]]. |
| − | * | + | * Half Orc - good melee class as they get a tactics bonus and no movement speed penalty in heavy armour. They also get faster rage gain. |
| + | * Gnome - good rogues & mages with their improved dexterity and intelligence, stealth and resistance to paralysis plus the ability to easily identify trapped chests. | ||
| + | * Bloodkin - good intelligence and magic resistance with a bonus to attack strength along with being able to leech mana from monsters they attack. | ||
| + | * Shadowfolk - make great rogues with their nightvision bonus, improved strength & dexterity, and shadowmeld ability. | ||
| + | * Halftroll - improved health regeneration plus the ability to dual wield any one handed weapons. | ||
| + | * Draconian - extra magic and normal damage plus improved magic resistance and the ability to transform into a drake that can traverse land, rivers and oceans. | ||
| + | * Dwarf - with a bonus to hp and an additional bonus to any of the 3 main stats, this race would be a good choice for any class. Also the only race that can mine, smelt, craft mithril, and get benefits from alcohol. | ||
| + | * Skeletun - play as the undead ... improved magic resistance plus protection from poison, disease, and no need to eat. | ||
| − | == | + | ==Main Menu== |
| + | Press F12 any time to bring up the main menu. Here you can change game options, change keybinds and read online help. | ||
| − | + | ==Newbie Island== | |
| + | Once you successfully connect to the server you will start on Newbie Island. Glance over the summary of keyboard controls (which you can view at any time with the '''?''' key ('''Shift + /''')) then press '''ESC''' to dismiss it. Press the '''?''' key twice to get a full list of keyboard controls! | ||
| − | + | Use either the mouse (left click and hold to walk in the direction of the green arrow) or the arrow keys to move around. You can use the numeric keypad to move diagonally. Follow the path east and let the lime coloured messages down below you on your way. | |
| − | Nordhaven Jail | + | [[image:newbieIsland.png]] |
| − | The newbie dungeon is a place where you can go kill some rats and other low level monsters. | + | |
| + | ==Entering Nordhaven== | ||
| + | Everybody starts in Nordhaven after completing Newbie Island. You'll probably have everything you need to start your adventure. | ||
| + | |||
| + | If you haven't already, you might want to '''w'''ear some armour & equip a weapon (hit the '''w''' key), and learn your spells (with '''r'''). Wander around town and say hello. | ||
| + | |||
| + | To say something to another player (they will have a white name above their heads with a blue health bar), hit ENTER and type your message, then hit ENTER again. | ||
| + | |||
| + | ==Starting Equipment== | ||
| + | The equipment your new character starts with varies depending on which class & skills you picked. All classes get basic provisions such as food and potions. | ||
| + | |||
| + | '''Weapons and Armour:'''<br> | ||
| + | [[image:ready.gif|right|frame|Readying your starting equipment]] Press '''w''' to '''w'''ear arms and armour, then scroll through the list using the up/down arrow keys. When you want to toggle the readiness of an item, press space. A little icon (such as a sword or or shirt) will appear to the left of the item name if it is being wielded or worn. | ||
| + | |||
| + | '''[[Items#Provisions|Provisions]]:''' | ||
| + | * Torches: press '''i''' to '''i'''gnite a torch | ||
| + | * Food: press '''e''' to '''e'''at some food | ||
| + | |||
| + | '''[[Items#Potions|Potions]]:'''<br> | ||
| + | Press '''p''' to drink a '''p'''otion... | ||
| + | * Red potions cure poison | ||
| + | * Yellow potions restore health points | ||
| + | * Blue potions restore mana points | ||
| + | |||
| + | '''[[Items#Scrolls|Scrolls]]:''' | ||
| + | * Town Portal - press '''r''' to '''r'''ead scrolls | ||
| + | |||
| + | ==Binding items and spells to keys== | ||
| + | For fast and easy use of items and spells you may bind them to almost any key on the keyboard. | ||
| + | |||
| + | * To bind items, during '''u'''se, '''v'''iew, '''w'''ear, etc, press either alt+key to bind the currently selected item to that key. Then during play, pressing a key with a bind will use the bound item or spell. | ||
| + | * Spells (and special abilities): press '''Shift+c''', then use the arrow keys to highlight the spell you want to bind, then hit the F-key you want to bind to, or alt+key. You can also bind some spells by pressing '''Shift-F-key'''. | ||
| + | |||
| + | TIP: binding spells & items to the F-keys allows them to be used with arrow keys & a combination of '''Shift''', '''Alt''' and '''Ctrl'''. See '''How to Cast offensively''' further down this page. | ||
| + | |||
| + | ==Talk to NPCs== | ||
| + | Just as players have white names and blue bars above their heads, characters with blue names and health bars are good aligned NPC's, while characters with gray bars above their heads are neutral aligned NPC's. Make a point of talking to any NPC with a blue name - you'll more than likely be sent on a quest. | ||
| + | |||
| + | To talk to an NPC, stand next to them, press '''t''', then select the direction of the NPC. If you see a druid called ''Max'', walk up to him and do exactly that. Then ask him his ''job'' (press enter, type job, then press enter again), or his ''name'', whether they have any "work" for you, or even the ''time''. Try continuing the conversation by asking about any of other words they have mentioned. | ||
| + | |||
| + | ==Exiting Town and entering other maps== | ||
| + | When you're done looking around town, you might as well head down to the Jail. Exit town by walking south past the guards (Harold and Stirling) - you will soon find yourself on the continent of [[New Sosaria]]. Head due east until you see a cave entrance - that would be the Nordhaven Jail. Stand on the entrance to the cave and press Space. | ||
| + | |||
| + | [[image:leavingtown.png|none|frame|Leaving Nordhaven: Nordhaven jail is just a few steps to the east]] | ||
| + | |||
| + | All of the areas in EUO are divided up into distinct maps. Towns exist as separate maps from the over-world, as do dungeons, caves, shrines, castles and keeps. To enter a town or dungeon, move toward the entrance and press Space. The entrance to a town is represented on the over-world as the town tile: just stand on top of it and press Space to enter. Inside dungeons, it is usually ladders that are used to move between levels. Again, just move on top of the ladder and press Space. | ||
| + | |||
| + | ==Nordhaven Jail: your First Serious Dungeon Romp== | ||
| + | [[image:jail.png|right|frame|Nordhaven jail. Note the ladder exiting up just to the south and Bill the Jailer just to the north.]] | ||
| + | The newbie dungeon is a place where you can go kill some rats and other low level monsters to get acquainted with the game. | ||
| + | |||
| + | Explore, kill, collect the treasure, sell the stuff you don't need, then spend the money on equipment. When you're feeling tougher and better armed, you can head down to levels 2, 3 & 4 of the newbie dungeon. Beware - opponents get tough pretty quickly though, it would be wise to have some decent armour and plenty of healing potions at the ready. | ||
| + | |||
| + | ===How to Attack=== | ||
| + | To attack with your equipped weapon (or with your bare hands if you don't have a weapon) stand next to your opponent and click on it when the mouse arrow turns red. If you prefer to use the keyboard, hold down '''Ctrl''' and press the arrow key corresponding to the direction you want to attack. E.g., to attack north, it's '''Ctrl+Up'''. '''Ctrl+left click''' will attack in any direction and not let you move. | ||
| + | |||
| + | If you are using a ranged weapon, '''Ctrl+left''' click or '''Ctrl+Up''' is used to attack your currently targeted enemy, regardless of the direction of the enemy. Press '''Tab''' to cycle enemy targets. | ||
| + | |||
| + | * '''left''' click on enemies when the mouse pointer turns into a red arrow | ||
| + | * '''ctrl+arrow key''' to attack in that direction | ||
| + | * '''ctrl+left click''' to fire your ranged weapon, also '''Ctrl+Up''' | ||
| + | |||
| + | ===How to Cast Offensively=== | ||
| + | If you picked mage as your class, then you should have learned the spell ''Minor Harm'' by now. Minor Harm (aka An Mani) deals damage to an adjacent target. Stand next to one of those rats, press '''c''', then '''a''' then '''m''' then enter, then the arrow key for the direction you want to cast. | ||
| + | |||
| + | This is a bit of work, so you can bind the spell such that you can cast it with '''Shift+direction'''. Press '''Shift+c''', then use the arrow keys to highlight the Minor Harm spell (if it isn't already highlighted), then hit '''F1''', followed by '''ESC'''. Minor Harm is now bound to the '''F1''' key, which you can hit to cast it. Additionally, using '''Shift+right click''' or '''Shift+arrow key''' will cast the spell bound to '''F1''' in the direction of the mouse arrow or arrow key pressed. | ||
| + | |||
| + | So you can now cast Minor Harm on rats with '''Shift+direction''' just as you would attack rats with a weapon with '''Ctrl+direction'''. | ||
| + | |||
| + | * bind Minor Harm to '''F1''' via '''Shift+c''' | ||
| + | * '''Shift+right''' click or '''Shift+direction''' to cast Minor Harm on enemies to harm them | ||
| + | |||
| + | '''Pro tip''' | ||
| + | * binding a spell to '''F7''' will let you cast it with just the right mouse button | ||
| + | * binding a spell to '''F8''' will let you cast it with '''Ctrl+right click''' | ||
| + | * you can bind additional spells to '''F2'''-'''F6''' and cast them with combinations of '''Ctrl''', '''Shift''', '''Alt''' and a direction | ||
| + | |||
| + | ===Healing Techniques for Newbies=== | ||
| + | There are quite a number of ways to heal yourself, however for the new character these can be limited. Here's a list of what you can do to heal yourself. | ||
| + | |||
| + | * drink a yellow potion (press '''p''') | ||
| + | * meditate (press '''n''') | ||
| + | * priests can cast the ''Mani'' spell (press '''c''' then '''m''' then Enter) | ||
| + | * you can use a bandage (tip: bind it to a key for easy access) | ||
| + | * you can drink from a fountain (can be hazardous, but can also be rewarding): activate the fountain with '''a''' | ||
| + | |||
| + | Health also regenerates while not in combat. | ||
| + | |||
| + | '''Pro tip''' | ||
| + | * use ('''u''') empty flasks on fountains to create clear potions, which will usually have an effect not unlike a yellow potion | ||
==Leveling up== | ==Leveling up== | ||
| + | [[image:valor.png|right|frame|The Shrine of Valor, on the far north coast of New Sosaria. To get there, leave Nordhaven and head northwest. Meditate at this shrine to increase your strength!]]When you get the blue "''You feel experienced''" message, head to a [[shrines|shrine]] (pictured right), press space to enter the shrine map (just as you did to enter Nordhaven Jail) and meditate near the flame (walk to the brazier and then press '''n''') to increase your stats. Every shrine has a different effect on your stats (strength, dexterity and intelligence) - consult the list in the next section. | ||
| − | + | '''New characters generally need to increase strength to start with, to give them more Hit Points. Head to the Shrine of Valor, which is to the north and a little west of Nordhaven.''' | |
| − | + | In general, you should increase your strength if you want more hit points (HP) and power with fighter weapons, increase dexterity if you want to move faster and power with rogue weapons, and increase intelligence if you want more mana, magic resistance and increased power with spells. | |
| − | + | A rough guide for stat point distribution while progressing through the levels might be: | |
| − | + | * '''Fighter / Monk''' - increase strength until you get 80-100 STR, then increase dexterity until you get to 100 DEX | |
| + | * '''Rogue''' - increase strength until you get to 60 STR, then increase dexterity until you get to 150 DEX | ||
| + | * '''Mage / Priest''' - increase strength until you get to 60 STR, then increase intelligence until you get to 100 INT and then increase strength again until you get to 100 STR | ||
| − | + | You don't have to follow this guide, however it will give you strength (and thus more hit points) early on to help make your adventures go smoothly. | |
| − | Valor: Strength+6 | + | |
| + | ==Shrines== | ||
| + | To locate a [[shrines|shrine]], either study the map of [[New Sosaria]] online, or look in your EUO folder for the shrinemap.gif in the docs subdirectory. | ||
| + | |||
| + | Meditating (after you get the ''You feel experienced'' message) at the different shrines have the following effects: | ||
| + | |||
| + | Valor: Strength +6 | ||
| + | Compassion: Dexterity +6 | ||
Honesty: Intelligence +6 | Honesty: Intelligence +6 | ||
| − | Sacrifice: Strength+3 Dexterity+3 | + | Sacrifice: Strength +3, Dexterity +3 |
| − | Justice: Dexterity+3 Intelligence+3 | + | Justice: Dexterity +3, Intelligence +3 |
| − | Honor: Intelligence+3 Strength+3 | + | Honor: Intelligence +3, Strength +3 |
| − | Spirituality: | + | Spirituality: Dexterity +2, Intelligence +2, Strength +2 |
Humility: Nothing | Humility: Nothing | ||
| − | Humility does not add any stats but will | + | Humility does not add any stats but will increase your level if you meditate there. Unless you are actually feeling humble, it's best not to level up at the Humility shrine! |
| + | Humility does have a use however - meditating there reduces your criminal status time more quickly than normal. | ||
| − | + | Finally, shrines are used to cure resurrection sickness, which is a debilitating condition you'll often get after dying and resurrecting. | |
| − | Just hit | + | ==Dying== |
| + | Everyone has to die eventually, and it's not a big deal. Just hit '''Alt+F1''' to respawn in the town to which you are bound (the default town is Nordhaven). Doing this will give you [[resurrection sickness]] however, which requires you to meditate at a [[Shrines|shrine]] to cure. While you have resurrection sickness, you will suffer significant penalties, so you should cure it as soon as you can. Alternatively if you're playing with other people, they might be able to resurrect you with a scroll or spell on the spot. If you are in a party with the person who resurrects you, you will not get resurrection sickness. | ||
| − | Sometimes you cannot respawn | + | Sometimes you cannot respawn with '''Alt+F1''' ... it is most likely because you are on a no-casting zone tile. If this happens simply move a step or two away and try again. |
| − | == | + | ==Additional equipment== |
| + | Once you've accumulated some gold, you'll probably want to get some additional equipment. Player merchants will have the best prices. Go to [http://euotopia.com/msearch.htm Player Merchant Item Search] and type at least part of the name of the item you're looking for. You'll need a sextant or an Locate spell to find the coordinates of the listed merchant in the town, but bearing in mind that coordinates start in the upper left corner of the map, you should be able to find the merchant without a sextant. | ||
| − | The goal is to have a bit of fun | + | ==The Goal== |
| + | The goal is to have a bit of fun! That's it. Happy hunting. | ||
Latest revision as of 00:57, 18 November 2020
Contents
- 1 Quickstart Guide
- 2 Tutorial Video
- 3 Character Creation
- 4 Main Menu
- 5 Newbie Island
- 6 Entering Nordhaven
- 7 Starting Equipment
- 8 Binding items and spells to keys
- 9 Talk to NPCs
- 10 Exiting Town and entering other maps
- 11 Nordhaven Jail: your First Serious Dungeon Romp
- 12 Leveling up
- 13 Shrines
- 14 Dying
- 15 Additional equipment
- 16 The Goal
Quickstart Guide
To get started, download the installer, install, create an account and run euo.exe.
This game is rather fast paced and even a little twitchy. Unlike other MMORPG's, you generally fight more than one monster at a time, and battles are usually pretty quick. It helps to know where your spells and items are and what they do. It also helps to have a guide early on in the game. There are many players who will happily take a newbie through their first romp of the Nordhaven Jail.
Tutorial Video
Character Creation
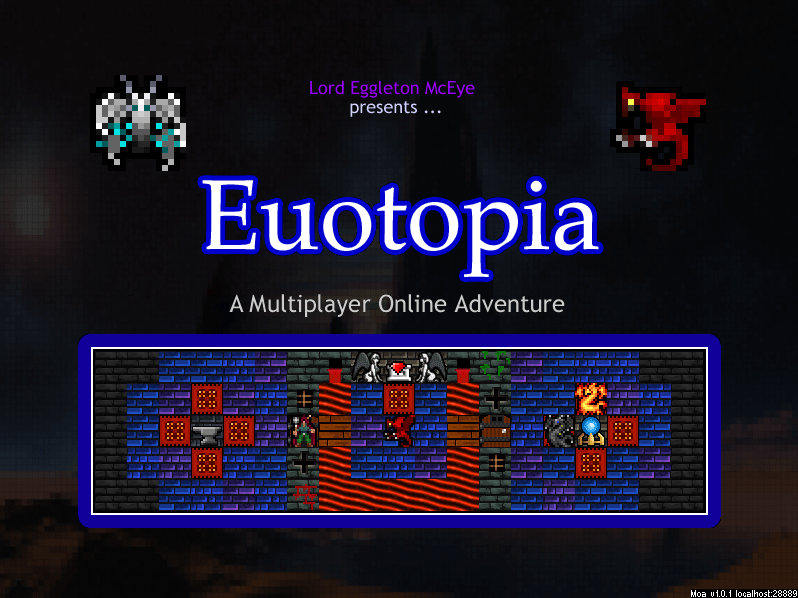
At this screen press any key. It should bring up the main menu. If it doesn't, alt-tab out and back in again, then press a key.
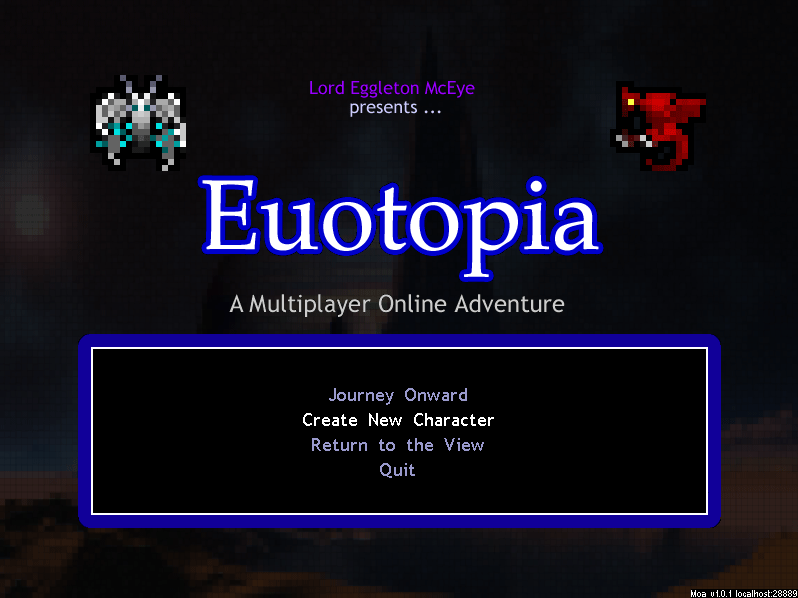
Press the arrow key down once so that Create New Character is highlighted, then hit Enter.
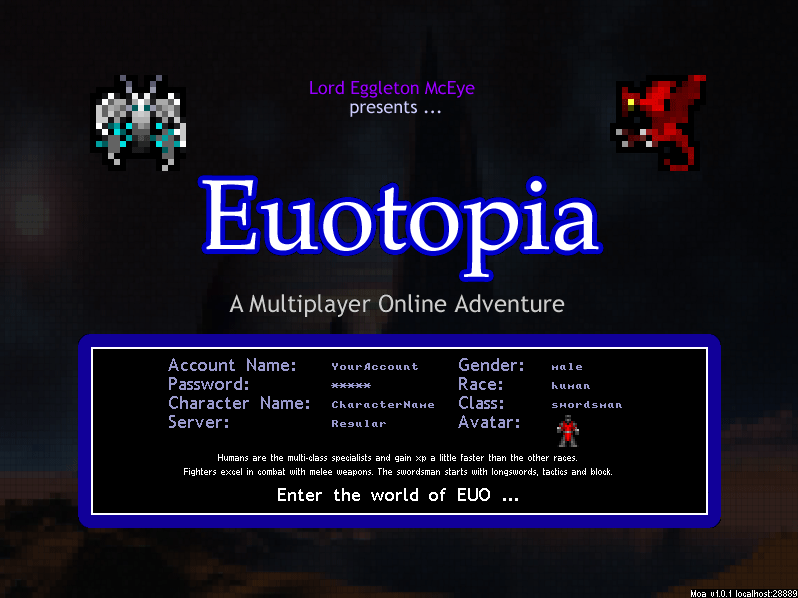
Enter your account name and password in the appropriate fields. Use the up and down arrow keys to navigate the fields. If you don't have an account then you will have to make one - click here. Pick a name, your gender (gender does not affects stats or gameplay), an avatar, your race and a class. Use the left and right arrows to select your gender, avatar and class. Once done, press the down-arrow key to highlight enter the world of EUO! and press enter.
If you are a brand new player simply choose the Regular server.
It's not critical which class you pick as it only affects starting skills. Your class evolves through your playstyle - though of course you can decide on a class to build and stick with that from the start. The classes you can choose from when creating are:
- swordsman, macefighter, spearman, axeman: these are fighter prefab packages, specialising in melee weapons and close quarter combat
- assassin, swashbuckler, ranger: these are rogue prefabs. Assassin is dual wielding and comes with points in stealth. Ranger starts with a bow and swashbuckler starts with a foil.
- monk: starts with points in unarmed and the sanctity school of magic
- mage: starts with points in sorcery and magery
- priest: starts with points in blessed maces, piety and divinity.
- necromancer: starts with points in necromancy, hexblades and bonecrafting
Remember: it's not critical what class you choose because the class you become is defined by what skills you use. See the section on classes for more.
Here's a quick overview of the available races:
- Human - Get a little more xp and can multiclass further than other races (on reg/pd) by meditating at the shrine of versatility.
- Half Orc - good melee class as they get a tactics bonus and no movement speed penalty in heavy armour. They also get faster rage gain.
- Gnome - good rogues & mages with their improved dexterity and intelligence, stealth and resistance to paralysis plus the ability to easily identify trapped chests.
- Bloodkin - good intelligence and magic resistance with a bonus to attack strength along with being able to leech mana from monsters they attack.
- Shadowfolk - make great rogues with their nightvision bonus, improved strength & dexterity, and shadowmeld ability.
- Halftroll - improved health regeneration plus the ability to dual wield any one handed weapons.
- Draconian - extra magic and normal damage plus improved magic resistance and the ability to transform into a drake that can traverse land, rivers and oceans.
- Dwarf - with a bonus to hp and an additional bonus to any of the 3 main stats, this race would be a good choice for any class. Also the only race that can mine, smelt, craft mithril, and get benefits from alcohol.
- Skeletun - play as the undead ... improved magic resistance plus protection from poison, disease, and no need to eat.
Main Menu
Press F12 any time to bring up the main menu. Here you can change game options, change keybinds and read online help.
Newbie Island
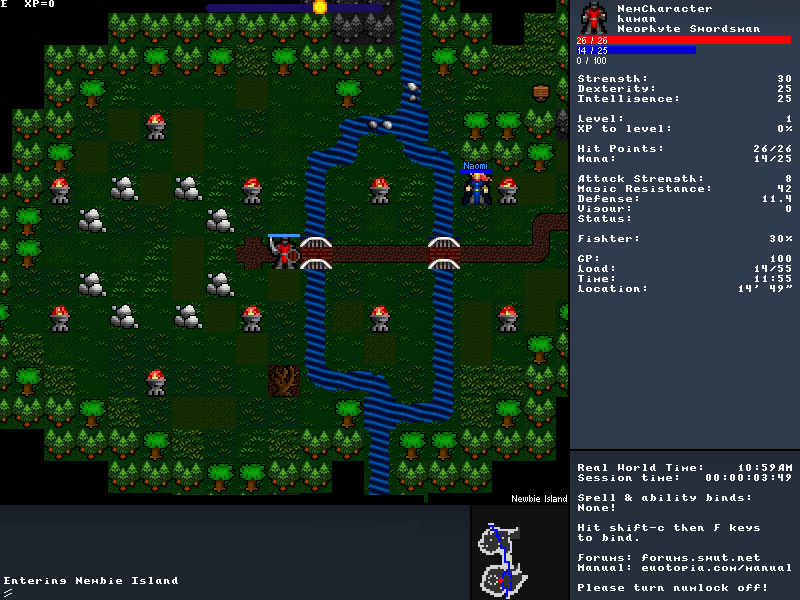
Once you successfully connect to the server you will start on Newbie Island. Glance over the summary of keyboard controls (which you can view at any time with the ? key (Shift + /)) then press ESC to dismiss it. Press the ? key twice to get a full list of keyboard controls!
Use either the mouse (left click and hold to walk in the direction of the green arrow) or the arrow keys to move around. You can use the numeric keypad to move diagonally. Follow the path east and let the lime coloured messages down below you on your way.
Entering Nordhaven
Everybody starts in Nordhaven after completing Newbie Island. You'll probably have everything you need to start your adventure.
If you haven't already, you might want to wear some armour & equip a weapon (hit the w key), and learn your spells (with r). Wander around town and say hello.
To say something to another player (they will have a white name above their heads with a blue health bar), hit ENTER and type your message, then hit ENTER again.
Starting Equipment
The equipment your new character starts with varies depending on which class & skills you picked. All classes get basic provisions such as food and potions.
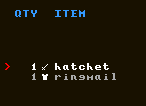
Weapons and Armour:
- Torches: press i to ignite a torch
- Food: press e to eat some food
Potions:
Press p to drink a potion...
- Red potions cure poison
- Yellow potions restore health points
- Blue potions restore mana points
- Town Portal - press r to read scrolls
Binding items and spells to keys
For fast and easy use of items and spells you may bind them to almost any key on the keyboard.
- To bind items, during use, view, wear, etc, press either alt+key to bind the currently selected item to that key. Then during play, pressing a key with a bind will use the bound item or spell.
- Spells (and special abilities): press Shift+c, then use the arrow keys to highlight the spell you want to bind, then hit the F-key you want to bind to, or alt+key. You can also bind some spells by pressing Shift-F-key.
TIP: binding spells & items to the F-keys allows them to be used with arrow keys & a combination of Shift, Alt and Ctrl. See How to Cast offensively further down this page.
Talk to NPCs
Just as players have white names and blue bars above their heads, characters with blue names and health bars are good aligned NPC's, while characters with gray bars above their heads are neutral aligned NPC's. Make a point of talking to any NPC with a blue name - you'll more than likely be sent on a quest.
To talk to an NPC, stand next to them, press t, then select the direction of the NPC. If you see a druid called Max, walk up to him and do exactly that. Then ask him his job (press enter, type job, then press enter again), or his name, whether they have any "work" for you, or even the time. Try continuing the conversation by asking about any of other words they have mentioned.
Exiting Town and entering other maps
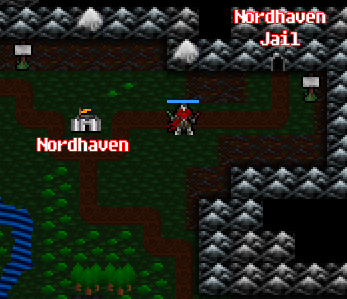
When you're done looking around town, you might as well head down to the Jail. Exit town by walking south past the guards (Harold and Stirling) - you will soon find yourself on the continent of New Sosaria. Head due east until you see a cave entrance - that would be the Nordhaven Jail. Stand on the entrance to the cave and press Space.
All of the areas in EUO are divided up into distinct maps. Towns exist as separate maps from the over-world, as do dungeons, caves, shrines, castles and keeps. To enter a town or dungeon, move toward the entrance and press Space. The entrance to a town is represented on the over-world as the town tile: just stand on top of it and press Space to enter. Inside dungeons, it is usually ladders that are used to move between levels. Again, just move on top of the ladder and press Space.
Nordhaven Jail: your First Serious Dungeon Romp
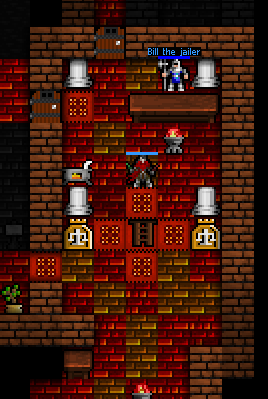
The newbie dungeon is a place where you can go kill some rats and other low level monsters to get acquainted with the game.
Explore, kill, collect the treasure, sell the stuff you don't need, then spend the money on equipment. When you're feeling tougher and better armed, you can head down to levels 2, 3 & 4 of the newbie dungeon. Beware - opponents get tough pretty quickly though, it would be wise to have some decent armour and plenty of healing potions at the ready.
How to Attack
To attack with your equipped weapon (or with your bare hands if you don't have a weapon) stand next to your opponent and click on it when the mouse arrow turns red. If you prefer to use the keyboard, hold down Ctrl and press the arrow key corresponding to the direction you want to attack. E.g., to attack north, it's Ctrl+Up. Ctrl+left click will attack in any direction and not let you move.
If you are using a ranged weapon, Ctrl+left click or Ctrl+Up is used to attack your currently targeted enemy, regardless of the direction of the enemy. Press Tab to cycle enemy targets.
- left click on enemies when the mouse pointer turns into a red arrow
- ctrl+arrow key to attack in that direction
- ctrl+left click to fire your ranged weapon, also Ctrl+Up
How to Cast Offensively
If you picked mage as your class, then you should have learned the spell Minor Harm by now. Minor Harm (aka An Mani) deals damage to an adjacent target. Stand next to one of those rats, press c, then a then m then enter, then the arrow key for the direction you want to cast.
This is a bit of work, so you can bind the spell such that you can cast it with Shift+direction. Press Shift+c, then use the arrow keys to highlight the Minor Harm spell (if it isn't already highlighted), then hit F1, followed by ESC. Minor Harm is now bound to the F1 key, which you can hit to cast it. Additionally, using Shift+right click or Shift+arrow key will cast the spell bound to F1 in the direction of the mouse arrow or arrow key pressed.
So you can now cast Minor Harm on rats with Shift+direction just as you would attack rats with a weapon with Ctrl+direction.
- bind Minor Harm to F1 via Shift+c
- Shift+right click or Shift+direction to cast Minor Harm on enemies to harm them
Pro tip
- binding a spell to F7 will let you cast it with just the right mouse button
- binding a spell to F8 will let you cast it with Ctrl+right click
- you can bind additional spells to F2-F6 and cast them with combinations of Ctrl, Shift, Alt and a direction
Healing Techniques for Newbies
There are quite a number of ways to heal yourself, however for the new character these can be limited. Here's a list of what you can do to heal yourself.
- drink a yellow potion (press p)
- meditate (press n)
- priests can cast the Mani spell (press c then m then Enter)
- you can use a bandage (tip: bind it to a key for easy access)
- you can drink from a fountain (can be hazardous, but can also be rewarding): activate the fountain with a
Health also regenerates while not in combat.
Pro tip
- use (u) empty flasks on fountains to create clear potions, which will usually have an effect not unlike a yellow potion
Leveling up
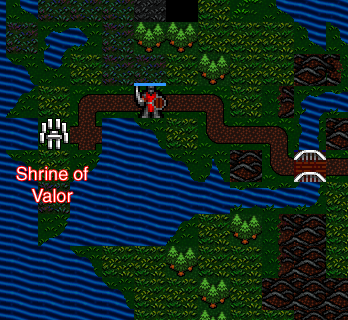
New characters generally need to increase strength to start with, to give them more Hit Points. Head to the Shrine of Valor, which is to the north and a little west of Nordhaven.
In general, you should increase your strength if you want more hit points (HP) and power with fighter weapons, increase dexterity if you want to move faster and power with rogue weapons, and increase intelligence if you want more mana, magic resistance and increased power with spells.
A rough guide for stat point distribution while progressing through the levels might be:
- Fighter / Monk - increase strength until you get 80-100 STR, then increase dexterity until you get to 100 DEX
- Rogue - increase strength until you get to 60 STR, then increase dexterity until you get to 150 DEX
- Mage / Priest - increase strength until you get to 60 STR, then increase intelligence until you get to 100 INT and then increase strength again until you get to 100 STR
You don't have to follow this guide, however it will give you strength (and thus more hit points) early on to help make your adventures go smoothly.
Shrines
To locate a shrine, either study the map of New Sosaria online, or look in your EUO folder for the shrinemap.gif in the docs subdirectory.
Meditating (after you get the You feel experienced message) at the different shrines have the following effects:
Valor:        Strength +6
Compassion:   Dexterity +6
Honesty:      Intelligence +6
Sacrifice:    Strength +3, Dexterity +3
Justice:      Dexterity +3, Intelligence +3
Honor:        Intelligence +3, Strength +3
Spirituality: Dexterity +2, Intelligence +2, Strength +2
Humility:     Nothing
Humility does not add any stats but will increase your level if you meditate there. Unless you are actually feeling humble, it's best not to level up at the Humility shrine!
Humility does have a use however - meditating there reduces your criminal status time more quickly than normal.
Finally, shrines are used to cure resurrection sickness, which is a debilitating condition you'll often get after dying and resurrecting.
Dying
Everyone has to die eventually, and it's not a big deal. Just hit Alt+F1 to respawn in the town to which you are bound (the default town is Nordhaven). Doing this will give you resurrection sickness however, which requires you to meditate at a shrine to cure. While you have resurrection sickness, you will suffer significant penalties, so you should cure it as soon as you can. Alternatively if you're playing with other people, they might be able to resurrect you with a scroll or spell on the spot. If you are in a party with the person who resurrects you, you will not get resurrection sickness.
Sometimes you cannot respawn with Alt+F1 ... it is most likely because you are on a no-casting zone tile. If this happens simply move a step or two away and try again.
Additional equipment
Once you've accumulated some gold, you'll probably want to get some additional equipment. Player merchants will have the best prices. Go to Player Merchant Item Search and type at least part of the name of the item you're looking for. You'll need a sextant or an Locate spell to find the coordinates of the listed merchant in the town, but bearing in mind that coordinates start in the upper left corner of the map, you should be able to find the merchant without a sextant.
The Goal
The goal is to have a bit of fun! That's it. Happy hunting.
